The picture shows the left wing after the clamps were removed and the wing turned upside down. I'm going to leave the stapling strips on until eveything is finished to provide a bit of protection to the wing skin. There are a lot of staples to be removed !
The left wing was then stored against the wall and the lower skin of the right wing glued onto the structure. Next job is to varnish the inside of the two wings to protect the wood. Then I'll install the various cables and tubing for the pitot before installing the top skin.
Wednesday, 5 December 2012
Tuesday, 4 December 2012
4th December 2012 - Left lower wing skin
Today it was time to glue the first of the lower wing skins into place. First job was to cut the 4-1/2" x 8' piece of ply cut off yesterday into 8 strips using the bandsaw. 4 of these will be used to staple the skin onto the two spars and leading and trailing edges of the wing. The rest will be cut up and used to staple the skin to the ribs.
A batch of West Systems Epoxy was made up with the slow 206 hardener. Even with the slow hardener the epoxy reaction is exothermic and in the confines of the mixing cup can get hot and gel quickly, so enough was made in the first batch to coat inside the lines marked on the skin itself.
Once the glue is spread out the working time is considerably extended so another batch was then made up to coat the wing structure itself.
The wing was first placed on the bench upside down and once all the glue was applied the skin was slotted over the strut attach brackets and into place. Working from the middle out the skin was then stapled onto the main spar. Then, again from the middle out, the skin was stapled to the ribs between the two spars. Next the skin was stapled to the rear spar and then the rearmost section of ribs and the trailing edge.
This process was repeated with the front section of ribs and the leading edge with the exception of the innermost stub rib. As the curve of the skin is greater at the front, clamps were also used to ensure the staples would hold. The wing was then turned over to check that the joints looked properly glued and clamped.
Then the skin was clamped onto the innermost stub rib. This is easy enough behind the main spar but in front of it there is a significant bend in the skin. Multiple clamps were
required to hold the skin to the tapered section of the main spar and to the stub rib itself as staples did not have enough holding capability. The front section of skin was also painted with epoxy which when fully set should help it to hold shape and reduce the stress on the glue joint. I think I will also install some fillets of wood in the joint before closing up the wing.
Next job a full 24 hours for the epoxy to set.
Monday, 3 December 2012
3rd December 2012 - Preparing the wings for the lower skins
Over the last few days I have glued the scarf joint for the other top wing skin and fastened the lower skin to the wingtip of the right wing. Today was spent sanding the scarf joints into the edges of the lower wingtip skins so that the main skins can overlap them. A 12" sanding block was prepared with sandpaper on 4" or so of the surface and then a smooth area over the rest of its length.. This allowed the block to rest on the penultimate rib whilst sanding the wingtip skin to create a flat level with the rest of the ribs. Easy enough to say but a long and laborious process! However, finally both wings were prepared ready for gluing the main skins. Next the full sheets of plywood
for the lower skins were cut down to a width of 42.5" which reaches neatly across the width of the wing. The offcuts will be used for making more sacrificial stapling strips.
A cardboard template was made to fit over the strut attach brackets. Then for each wing in turn the lower skins were positioned and the locations for the cutouts marked. The template was then used to trace the outline and a rotary rasp used in the Dremel to cut to the outline. Following a bit ot trial and error the hole was then made to fit snuggly over the brackets and the wings skins positioned ansd clamped into place. The wings were then turned over and the positions of the ribs and spars marked in pencil - just visible in the picture. These markings will allow the glue to be applied in the right places without too much excess. Like the wingtips, the markings were also then transferred to the outside of the skin to allow correct positioning of the attachment staples into the ribs and spars. Next job to glue one!
25th November 2012 - Skinning the left lower wingtip
Unlike the top surface of the wing where the spar is level all the way to the wingtip, it tapers up to the wingtip from the last full size rib. This creates a natural angle to make a scarf joint between the main wing skin and that of the tip so the tip can be skinned first and then sanded level with the line of the main ribs to create the scarf joint with the main lower wing skin. Crucial to this working is the fact that the bottom of the last full size rib was sanded to match the slope of the wingtip rather than just being flat like the other ribs.
A piece of the 3/32" mahogany ply was cut out to roughly match the shape of the wing tip. This was then clipped to the wing and the position of the ribs and spars marked on the inside of the skin in pencil. Sacrificial strips were cut from scrap ply to enable staples to be used to secure the skin while the glue set which could then be removed without damaging the skin proper. The rib and spar positions marked on the inside of the skin were also transfered to the outside to allow positioning of the staples.
Then a batch of West Systems epoxy was made with the usual 5% by weight of microfibre. This was applied to the wing tip structure and between the pencil marks on the inside of the skin. The skin was then positioned onto the wing structure and fastened into position with staples from the spar outwards. Every clamp I possess was then used to secure the edges of the skin and the glue left to dry overnight.
24th November 2012 - Scarfing part 2
Having cut the scarf joints yesterday, today the first pair were glued together. The glue used was West Systems epoxy with 5% by weight of 403 microfibres added to improve the strength and gap filling properties of the mix. For a small area like this the fast version of the hardener (205) was used with the standard 105 epoxy. First a piece of plastic was taped to the bench under where the glue joint would be positioned. Then glue was applied to the two mating surfaces. Staples were fired through some scrap wood to fasten the first piece of plywood to the workbench. Then the second piece was positioned with the scarf joints overlapping and more staples used to hold this in position. Excess glue was carefully wiped off the joint. Left overnight to set, the two pieces of plywood magically became one!
23rd November 2012 - Scarfing the wing skins
The summer has past with almost no work done on the Tailwind - too many distractions have competed for my available time. However with the shorter days the scope for outdoor activities has reduced and it is time to make some progress. The fuselage has been wrapped in a large tarpaulin and parked in the drive so I can get on with skinning the wings. First job is one I have been putting off, joining the two sheets of mahogany ply that will form the top surface.
If you google scarfing there are all sorts of mechanisms proposed ranging from simple sanding, through routing to sawing. The idea is to create a matching slope on each piece of wood so that the glue area is increased. Typically, the slope is of the order of 12:1, so in the case of the 3/32" plywood used for the wings the gluing area will be increased to 1-1/8". I elected to use my powered plane to cut the scraft angle. First a piece of angle aluminium was fastened to the plane to create the requisite 12:1 slope. Also, a piece of aluminium was screwed to the bench to create a straight edge for the plane to run along. Then, first on a piece of scrap material pushed tight against the straight edge, the plane was run along the width of the board using a cutting depth of 1/32".
Much to my surprise this worked perfectly cutting a neat line along the edge at the requisite angle. Two more passes of the plane cut the full depth of the joint.
The scrap material was then cut to form a run-on and run-off for cutting the actual material. The full sheet of ply was then positioned and the three passes made again - another success!!
This was repeated for the other full sheet of ply and two shorter pieces which together will cover the top surfaces of the wings and the wingtips.
Tuesday, 10 April 2012
10th April 2012 - Fuselage priming complete
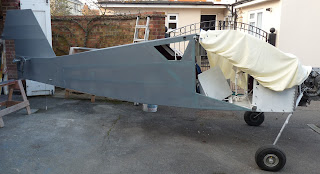
. I spent a happy day last week masking off all of the fuselage internals ready for spray painting the fuselage fabric with the EkoFill primer. Then the second brush coat of primer was applied to the fuselage sides and the paint rubbed down with 300 grade open coat sandpaper. Next the cowl attach brackets were primed and top coated and these were then riveted into place along the edge of the firewall together with the lower windscreen trim strip, the cowl side cheeks and lower panel. The metal panels and gear legs were then primed with EkoPrime and two cross coats of EkoFill applied to the fuselage. The inside of the airboax was also primed and topcoated and then riveted together. This has completed an number of tasks on the "to-do" list which has been updated accordingly.
Saturday, 31 March 2012
31st March 2012 - To Do list
Today I spent stripping out various internals ready for spraying. I also set about working out a to do list to complete the fuselage (this will still leave the wings to be skinned) as follows:
- Apply second brush coat of EkoFill to fuselage sides
- Mask fuselage internals and spray 2 crosscoats of filler on to fuselage sides
- Apply EkoFill to control surfaces: rudder, two off ailerons, two off flaps, two off elevators, two off horizontal stabilisers
- Make drainholes in control surfaces
- Apply EkoPoly to control surfaces
- Prime and top coat all cowl attach brackets and spacers
- Final fit front fuselage side panels and rivet into place on firewall with cowl attach brackets
- Reprime front fuselage sides with EkoPrime to ensure topcoat colour match
- Reprime front fuselage lower panel with EkoPrime to ensure topcoat colour match
- Cut access hole in combing to allow fuel level sender to be calibrated, make and fit removable cover
- Respay combing and refit
- Fabricate internal and external cover plates over tank filler hole in windscreen, prime and topcoat
- Install tank filler in windscreen and refit windscreen
- Rivet Front windscreen edge strip to firewall and cowl attach brackets
- Rivet lower cowl attach brackets to firewall
- Prime undercarriage legs
- Topcoat complete fuselage and undercarriage with white EkoPoly
- Final weld right door latch
- Fabricate left and right door latch covers
- Fabric cover left and right door internal structure
- Apply EkoFill to door internal skins
- Topcoat doors with white EkoPoly
- Fabricate and install remaining transparencies: Two off door, two off forward fuselage sides, two off rear fuselage sides
- Seal inside of airbox with pigmented resin
- Paint topcoat airbox metalwork
- Rivet together airbox
- Apply second coat of pigmented resin to seal inside of top cowl
- Final fit cowl
- Fill pinholes in cowl and prime
- Topcoat cowl with white EkoPoly
- Install cowl and mask for applying red fineline along fuselage and cowl
- Topcoat spinner backplate with red EkoPoly
- Spray fineline with red EkoPoly
- Apply glass cloth reinforcement to top of leg spats
- Prime leg spats with EkoPrime
- Topcoat leg spats with white EkoPoly
- Drill undercarriage ends to take cotter pins to secure wheel nuts
- Install brakes
- Fabricate brake pipes, fill, bleed, and pressure test brake lines
- Test install wheel spats, fabricate inside support bracket to fit
- Sand and prime wheel spats
- Topcoat wheel Spats with white EkoPoly
- Fabricate engine baffles
- Fabricate engine exhaust system
- Fabricate leg to fuselage intersection fairings
- Fabricate leg to wheel spat intersection fairings
Friday, 30 March 2012
30th March 2012 - Finally some painting progress!
Subscribe to:
Posts (Atom)